 e801a4d509
Replace the legacy multi-LBM transport layer with one shared pool:

- one bitmap-indexed pool of CONFIG_BLE_LOG_POOL_TRANS_CNT transports
  with a non-yield reserve for ISR and critical-section writers;
- per-transport state machine (FREE/OPEN/CLAIMED/SENDING) guarded by a
  per-transport CAS lock; bitmaps are only candidate hints;
- claim/commit interface for the compressed-log path; claim bookkeeping
  lives in the pool (ble_log_pool_claim_t), not in the peripheral
  transport;
- dedicated Internal Snapshot transport and fixed-layout snapshot
  record (reason flags, version block, lc/esp/os clock samples, pool
  state, compact core statistics);
- source-local 24-bit wire sequences and compact per-source counters;
- UART console redirection stream writer (ble_log_redir_t);
- CMakeLists compiles ble_log_lbm_v2.c instead of ble_log_lbm.c; the
  legacy ble_log_lbm.c/.h stay in-tree, out of the build, until their
  removal;
- the public ble_log_src_t ABI is restored and frozen; protocol v7
  wire source IDs are a separate internal enum (ble_log_wire_src_t)
  and the older BLE Stack sources map onto the v7 core sources
  (LL_TASK/LL_ISR -> LL, LL_HCI/HCI -> HCI, HOST -> CUSTOM);
  BLE_LOG_VERSION 7;
- Kconfig: pool sizing options replace the LBM options, whose names
  remain as hidden deprecated symbols for backward sdkconfig
  compatibility; BLE_LOG_HOST_SIDE_HCI_LOG_ENABLED becomes the single
  BLE_LOG_HCI_LOG_ENABLED switch for host and controller HCI traffic
  (Bluedroid and NimBLE host call sites follow the rename), enabled
  by default on all targets instead of only where
  BLE_LOG_IS_ESP_LEGACY_CONTROLLER; the old name keeps a deprecated
  promptless shim that selects the new symbol, so sdkconfig files
  still pinning it keep host HCI logging enabled;
- util: ble_log_cas_acquire/release become macros; multi-call-site
  pool helpers are no longer inline (IRAM);
- test app record structs gain a source_meta field for the v7 wire
  source byte;
- the Internal Snapshot no longer carries a schema_version: the record
  is self-identifying via int_src_code and the version block.
Espressif IoT Development Framework
ESP-IDF is the development framework for Espressif SoCs supported on Windows, Linux and macOS.
ESP-IDF Release Support Schedule
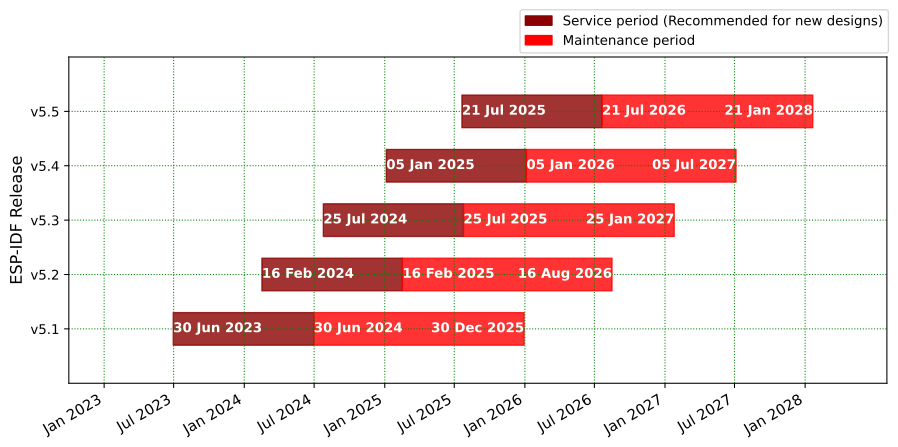
- Please read the support policy and the documentation for more information about ESP-IDF versions.
- Please see the End-of-Life Advisories for information about ESP-IDF releases with discontinued support.
ESP-IDF Release and SoC Compatibility
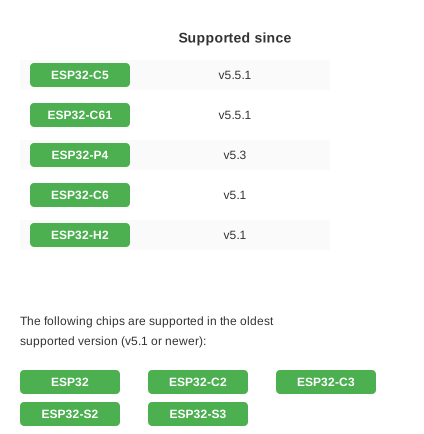
See Compatibility Between ESP-IDF Releases and Revisions of Espressif SoCs for the details of the compatibility between ESP-IDF and chip revisions.
Espressif SoCs released before 2016 (ESP8266 and ESP8285) are supported by RTOS SDK instead.
Developing With ESP-IDF
Setting Up ESP-IDF
See https://idf.espressif.com/ for links to detailed instructions on how to set up the ESP-IDF depending on chip you use.
Note: Each SoC series and each ESP-IDF release has its own documentation. Please see Section Versions on how to find documentation and how to checkout specific release of ESP-IDF.
Non-GitHub forks
ESP-IDF uses relative locations as its submodules URLs (.gitmodules). So they link to GitHub. If ESP-IDF is forked to a Git repository which is not on GitHub, you will need to run the script tools/set-submodules-to-github.sh after git clone.
The script sets absolute URLs for all submodules, allowing git submodule update --init --recursive to complete. If cloning ESP-IDF from GitHub, this step is not needed.
Finding a Project
As well as the esp-idf-template project mentioned in Getting Started, ESP-IDF comes with some example projects in the examples directory.
Once you've found the project you want to work with, change to its directory and you can configure and build it.
To start your own project based on an example, copy the example project directory outside of the ESP-IDF directory.
Quick Reference
See the Getting Started guide links above for a detailed setup guide. This is a quick reference for common commands when working with ESP-IDF projects:
Setup Build Environment
(See the Getting Started guide listed above for a full list of required steps with more details.)
- Install host build dependencies mentioned in the Getting Started guide.
- Run the install script to set up the build environment. The options include
install.batorinstall.ps1for Windows, andinstall.shorinstall.fishfor Unix shells. - Run the export script on Windows (
export.bat) or source it on Unix (source export.sh) in every shell environment before using ESP-IDF.
Configuring the Project
idf.py set-target <chip_name>sets the target of the project to<chip_name>. Runidf.py set-targetwithout any arguments to see a list of supported targets.idf.py menuconfigopens a text-based configuration menu where you can configure the project.
Compiling the Project
idf.py build
... will compile app, bootloader and generate a partition table based on the config.
Flashing the Project
When the build finishes, it will print a command line to use esptool to flash the chip. However you can also do this automatically by running:
idf.py -p PORT flash
Replace PORT with the name of your serial port (like COM3 on Windows, /dev/ttyUSB0 on Linux, or /dev/cu.usbserial-X on MacOS. If the -p option is left out, idf.py flash will try to flash the first available serial port.
This will flash the entire project (app, bootloader and partition table) to a new chip. The settings for serial port flashing can be configured with idf.py menuconfig.
You don't need to run idf.py build before running idf.py flash, idf.py flash will automatically rebuild anything which needs it.
Viewing Serial Output
The idf.py monitor target uses the esp-idf-monitor tool to display serial output from Espressif SoCs. esp-idf-monitor also has a range of features to decode crash output and interact with the device. Check the documentation page for details.
Exit the monitor by typing Ctrl-].
To build, flash and monitor output in one pass, you can run:
idf.py flash monitor
Compiling & Flashing Only the App
After the initial flash, you may just want to build and flash just your app, not the bootloader and partition table:
idf.py app- build just the app.idf.py app-flash- flash just the app.
idf.py app-flash will automatically rebuild the app if any source files have changed.
(In normal development there's no downside to reflashing the bootloader and partition table each time, if they haven't changed.)
Erasing Flash
The idf.py flash target does not erase the entire flash contents. However it is sometimes useful to set the device back to a totally erased state, particularly when making partition table changes or OTA app updates. To erase the entire flash, run idf.py erase-flash.
This can be combined with other targets, ie idf.py -p PORT erase-flash flash will erase everything and then re-flash the new app, bootloader and partition table.
Resources
-
Documentation for the latest version: https://docs.espressif.com/projects/esp-idf/. This documentation is built from the docs directory of this repository.
-
The esp32.com forum is a place to ask questions and find community resources.
-
Check the Issues section on github if you find a bug or have a feature request. Please check existing Issues before opening a new one.
-
If you're interested in contributing to ESP-IDF, please check the Contributions Guide.