 06478ec313
TS sync now always runs: the periodic tick (TS sample, OPEN transport
flush, internal snapshot) exists in every build, so the unified periodic
output no longer depends on BLE_LOG_TS_ENABLED and idle systems without
dispatch activity still flush every second.

- New BLE_LOG_TS_SYNC_TOGGLE_IO_ENABLED gates only the analyzer toggle
  IO (GPIO config, level writes, reset); with it unset, TS snapshots
  still sample the clocks and carry io_level = 0. BLE_LOG_TS_ENABLED
  keeps its prompt as a deprecated compatibility entry that selects
  BLE_LOG_TS_SYNC_TOGGLE_IO_ENABLED, so existing projects keep the old
  toggle behavior, and the TS trigger entries drop their dependency on
  it.
- ble_log_ts is no longer a separate module: its 95-line shell (clock
  sampling, toggle IO management) joins ble_log_rt.c, the only runtime
  that drives it. ble_log_ts_info_t moves to ble_log_lbm_v2.h (the
  snapshot interface that consumes it), the BLE_LOG_GET_LC_TS chip
  table moves next to its single caller, the init/deinit folds into
  ble_log_rt_init/deinit, the reset folds into ble_log_sync_enable, and
  the sampler becomes a void static now that its failure paths are gone.
- The runtime hook is gone: with the tick always present, its throttled
  defer-callback fallback for runtime-disabled sync served no one. The
  TS tick is the only periodic output source; ble_log_sync_enable(false)
  now means full periodic silence, and ble_log_rt_dispatch loses its
  return value. The version-info regression now arms the tick instead
  of the hook.
- BLE_LOG_GET_LC_TS branches on CONFIG_BT_DUAL_MODE_ARCH: the
  dual-mode-arch controllers (ESP32-H4, ESP32-S31) expose their link
  layer timer as r_sched_timer_getCurrentTimeU32, but the symbol is
  obfuscated in the current prebuilt libraries, so those targets report
  lc_ts = 0 for now; call the accessor once the libraries export it.
  The Gen 2 branch keeps r_ble_lll_timer_current_tick_get (defined by
  every C5/C6/C61/H2/H21 library, verified by nm and by linking
  ble_log_test for ESP32-C6); ESP32-H4 and ESP32-S31 fall out of it.
- ble_log_ts_info_update's old shape is gone entirely: the heap-allocated
  global ts_info and its critical section memcpy were leftovers from the
  pointer-return API; the sampler writes the caller object in place and
  keeps only the toggle IO phase as cross-call state. int_src_code is
  filled outside the critical section; the phase toggle stays inside to
  exclude the write in ble_log_sync_enable.

Idle systems no longer touch the controller clock: the legacy
accessors dereference controller state and INIT precedes controller
initialization, so the sampler returns lc_ts = 0 while the controller
is idle instead of reading it. The deferred dispatch callback drains
only the queue depth observed at entry and re-arms itself for arrivals
left behind, so it cannot monopolize the shared ESP timer task.
Espressif IoT Development Framework
ESP-IDF is the development framework for Espressif SoCs supported on Windows, Linux and macOS.
ESP-IDF Release Support Schedule
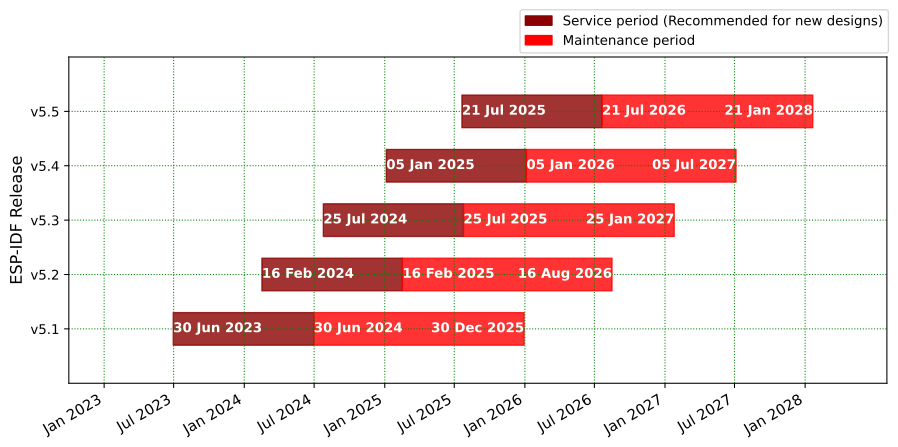
- Please read the support policy and the documentation for more information about ESP-IDF versions.
- Please see the End-of-Life Advisories for information about ESP-IDF releases with discontinued support.
ESP-IDF Release and SoC Compatibility
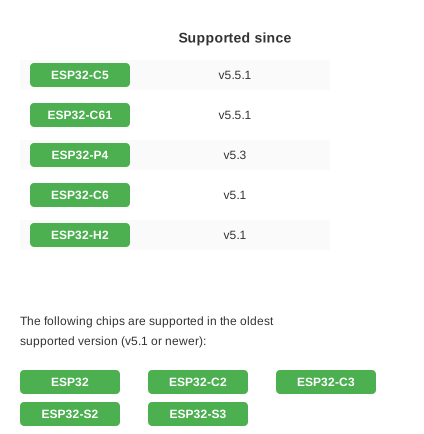
See Compatibility Between ESP-IDF Releases and Revisions of Espressif SoCs for the details of the compatibility between ESP-IDF and chip revisions.
Espressif SoCs released before 2016 (ESP8266 and ESP8285) are supported by RTOS SDK instead.
Developing With ESP-IDF
Setting Up ESP-IDF
See https://idf.espressif.com/ for links to detailed instructions on how to set up the ESP-IDF depending on chip you use.
Note: Each SoC series and each ESP-IDF release has its own documentation. Please see Section Versions on how to find documentation and how to checkout specific release of ESP-IDF.
Non-GitHub forks
ESP-IDF uses relative locations as its submodules URLs (.gitmodules). So they link to GitHub. If ESP-IDF is forked to a Git repository which is not on GitHub, you will need to run the script tools/set-submodules-to-github.sh after git clone.
The script sets absolute URLs for all submodules, allowing git submodule update --init --recursive to complete. If cloning ESP-IDF from GitHub, this step is not needed.
Finding a Project
As well as the esp-idf-template project mentioned in Getting Started, ESP-IDF comes with some example projects in the examples directory.
Once you've found the project you want to work with, change to its directory and you can configure and build it.
To start your own project based on an example, copy the example project directory outside of the ESP-IDF directory.
Quick Reference
See the Getting Started guide links above for a detailed setup guide. This is a quick reference for common commands when working with ESP-IDF projects:
Setup Build Environment
(See the Getting Started guide listed above for a full list of required steps with more details.)
- Install host build dependencies mentioned in the Getting Started guide.
- Run the install script to set up the build environment. The options include
install.batorinstall.ps1for Windows, andinstall.shorinstall.fishfor Unix shells. - Run the export script on Windows (
export.bat) or source it on Unix (source export.sh) in every shell environment before using ESP-IDF.
Configuring the Project
idf.py set-target <chip_name>sets the target of the project to<chip_name>. Runidf.py set-targetwithout any arguments to see a list of supported targets.idf.py menuconfigopens a text-based configuration menu where you can configure the project.
Compiling the Project
idf.py build
... will compile app, bootloader and generate a partition table based on the config.
Flashing the Project
When the build finishes, it will print a command line to use esptool to flash the chip. However you can also do this automatically by running:
idf.py -p PORT flash
Replace PORT with the name of your serial port (like COM3 on Windows, /dev/ttyUSB0 on Linux, or /dev/cu.usbserial-X on MacOS. If the -p option is left out, idf.py flash will try to flash the first available serial port.
This will flash the entire project (app, bootloader and partition table) to a new chip. The settings for serial port flashing can be configured with idf.py menuconfig.
You don't need to run idf.py build before running idf.py flash, idf.py flash will automatically rebuild anything which needs it.
Viewing Serial Output
The idf.py monitor target uses the esp-idf-monitor tool to display serial output from Espressif SoCs. esp-idf-monitor also has a range of features to decode crash output and interact with the device. Check the documentation page for details.
Exit the monitor by typing Ctrl-].
To build, flash and monitor output in one pass, you can run:
idf.py flash monitor
Compiling & Flashing Only the App
After the initial flash, you may just want to build and flash just your app, not the bootloader and partition table:
idf.py app- build just the app.idf.py app-flash- flash just the app.
idf.py app-flash will automatically rebuild the app if any source files have changed.
(In normal development there's no downside to reflashing the bootloader and partition table each time, if they haven't changed.)
Erasing Flash
The idf.py flash target does not erase the entire flash contents. However it is sometimes useful to set the device back to a totally erased state, particularly when making partition table changes or OTA app updates. To erase the entire flash, run idf.py erase-flash.
This can be combined with other targets, ie idf.py -p PORT erase-flash flash will erase everything and then re-flash the new app, bootloader and partition table.
Resources
-
Documentation for the latest version: https://docs.espressif.com/projects/esp-idf/. This documentation is built from the docs directory of this repository.
-
The esp32.com forum is a place to ask questions and find community resources.
-
Check the Issues section on github if you find a bug or have a feature request. Please check existing Issues before opening a new one.
-
If you're interested in contributing to ESP-IDF, please check the Contributions Guide.